Closed captions
What are closed captions (and how are they different from subtitles)?
Let's start with subtitles. Subtitles are a text alternative to the dialogue spoken in a video.
You may have used them when you were watching TV, translating another language in to English for instance. You may also have used them when you can't understand what the mumbling characters are saying, no matter what language they are saying it in.
Closed captions go further than subtitles. They describe important sounds as well as the dialogue. On your TV, you may see some films or programmes with "English CC" listed under the subtitles. These are closed captions.
Closed captions help people with hearing impairments understand exactly what is going on in a video. The addition of important sounds in the closed captions gives the person with a hearing impairment the same understanding of the content as a person who can hear.
Examples of important sounds can be [a train approaching] or [ominous dramatic music] (or both) as Jenny plays gleefully on the railway tracks, oblivious to the danger (because she's got her AirPods in).
We need to have closed captions on our videos to comply with the accessibility regulations.
What to include in your closed captions
In the context of our videos, as well as all the dialogue/narration, you may want to include information about the [fast comedy music] you are using or if there's [applause]. We tend to add this sound information in square brackets to distinguish it from dialogue.
It is also good practice to include the name of the speakers in your video, particularly if you are switching between them, so that the person with a hearing impairment is absolutely clear about who is saying what. For example, Toby: A name and a colon will be enough. Kelly: I agree.
By the time you get to adding a video to the University of Derby website with a media embed in Terminal Four, all your closed caption work should have been completed in YouTube. Your closed captions will then help you create your media embed transcript in T4.
How to create a subtitle file with closed captions
We add our closed captions to our videos by using the "subtitle" tools in YouTube. We do this by creating what is known as an SRT file (it stands for SubRip text file, named for the software program).
Do not be fooled by the term "subtitles". What we are creating here are closed captions. And YouTube is going to give us a hand.
Here's our step-by-step guide to creating closed captions:
1. Your own YouTube account
Create a YouTube account attached to your work email address. Make the account private. You may have a YouTube account already. It's OK to use this.
2. Uploading the video
Upload the final approved video to your YouTube account by selecting the "Create" button on the top right of your dekstop browser screen and following the instructions.
3. Processing the video
Allow YouTube to process the video. You do not need to worry about the playlist or thumbnail options, but, as the video is processing, answer "No" to the audience question "Is this video made for kids?" and select unlisted or private in the visibility options. It is vital that private or unlisted is selected if you have an existing active YouTube channel.
4. Finding your video
Once your video is fully processed and uploaded, select Your videos from the options listed down the left-hand side of your browser screen. Your newly uploaded video should appear at the top of your list.
5. Opening up your subtitles folder
Select your video and then select Subtitles from the options in the left-hand menu.
6. Automatic subtitles
YouTube will do a lot of the work for you by creating automatic subtitles for your video. You might need to wait for YouTube to complete this. Depending on the length of your video, it can take anything from a few minutes to a few hours. So it's probably a good idea to go and do something else for a while. NB It took YouTube about 10 minutes to generate captions for my example video, which is one minute and seven seconds long.
Once YouTube has created the automatic subtitles, you will see a listing under the Video subtitles heading, showing a date and, to the far right, an invitation to "Duplicate and edit". Select this.
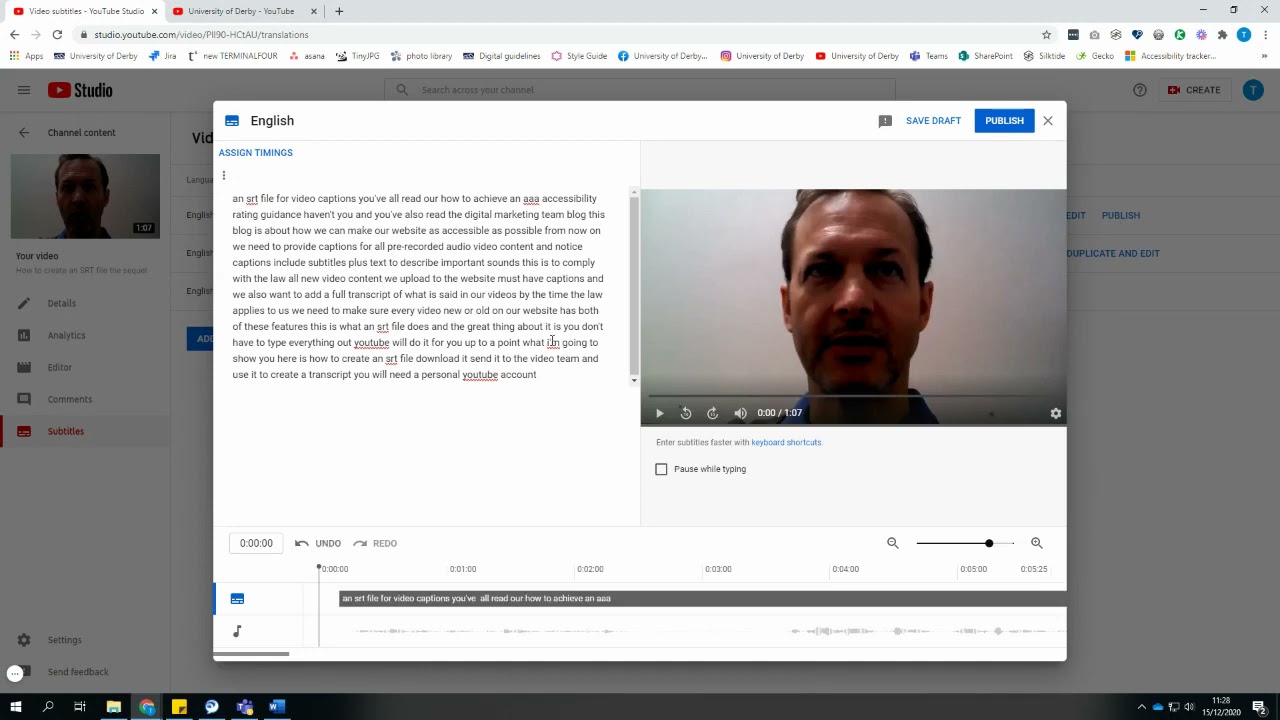
7. Editing panel
Your editing panel will open up to allow you to edit your subtitles and turn them into closed captions.
YouTube will have done a reasonable job to take the spoken dialogue and translate this into text. How accurate this is depends on the clarity of speech in the video. It will also create some closed caption information where it hears music by adding [music].
Your caption text will appear initial as a single block of text. You will see an invitation to "Assign timings". Select this and your text will separate into short text blocks with timings next to them.
8. Correcting your content
There will be no punctuation in these raw, automated captions. You will need to add capital letters at the start of each sentence, full stops at the end of them, commas at relevant points and initial capitals for proper names (and every time we mention the University). Check grammar, spelling and style. Play the video in the edit panel to ensure that the text accurately reflects what is said in the video.
Where there is [music], you can edit this information, if it is important, by saying what type of music this is (this is relevant if you are trying to evoke a particular emotion with this music).
9. Publish your content
When you have finished all your edits and corrections and checked that the captions are synchronised to the video, click on the publish button.
10. 'Published by creator'
A new item will have appeared in your Video subtitles list. This one will say "Published by Creator" in the subtitles column and the language will be English, not English (Automatic).
11. Download your SRT file
Hover next to "Edit" on the "Published by Creator" line, click on the three dots that appear. Select "Download" and choose the ".srt" option. This will download the closed captions file into your downloads folder.
12. Submit your video and closed captions
Next steps are to get your video footage approved. You will need to complete the YouTube upload form. Please submit your video file and your closed caption file to r.oriordan@derby.ac.uk using WeTransfer (wetransfer.com). Before sending, please ensure the file name of your video matches the video title listed on your YouTube upload form.
If you have any questions, do not hesitate to contact r.oriordan@derby.ac.uk.